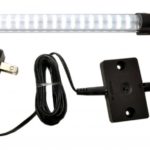
This video explains how to connect flexible strips to our Tiger Paw Connectors. For this project you’re going to need LED flex strips, your connector and a power supply. The video demonstration uses a 3.5-millimeter connector, but Inspired LED also makes them available in 5.5 millimeter.
- When you’re cutting your flex strip, make sure that you don’t cut through any of the solder. If you cut through the solder, it’s not going to fit into the connector. So go a few LED lights up and cut through the copper colored positive and negative.
- Next, peel the end of the tape off of your flex strip and begin to put it into your connector. You need to make sure that your connector is open before you do this. You also need to make sure that the positives and negatives are aligned.
- Now lock the flex strip in place by pushing the black piece back into the white piece. You may need to wiggle in there to make sure that the connection is fully locked.
- Peel the adhesive off the flex strip and stick it firmly to the connector.
- Simply plug your power supply in, remove the tape and stick your LED lights wherever you desire.
Inspired LED makes creating your own custom LED lights fast, affordable and easy. If you have any questions about how to install your LED lights please email us at info@inspiredled.com or visit our website at www.inspiredled.com.