The LED driver is the unsung hero of every low-voltage lighting project. Get it right and your lights perform flawlessly for years. Get it wrong and you’ll face flickering, overheating, premature failure, and a lot of troubleshooting frustration.
Yet choosing the right LED driver is one of the steps that trips up the most contractors, electricians, and DIYers because the terminology can be confusing, the spec sheets dense, and the options overwhelming.
This guide cuts through all of that. By the end, you’ll know exactly how to match a driver to your LED strip lights, size it correctly for your wattage load, choose the right dimming method, and pick the appropriate enclosure rating for your environment.
Quick Reference
An LED driver converts 120V AC wall power to safe, regulated DC output (typically 12V or 24V). You need to match: (1) voltage, (2) wattage capacity, (3) dimming method, and (4) IP rating. Get all four right and your install will be rock-solid.
What is an LED Driver and Why Does it Matter?
An LED driver — also called an LED power supply or LED transformer — is an electrical device that converts 120V AC power from your wall outlet into the low-voltage DC power that LED strip lights require. It also regulates that output to maintain consistent current and voltage, protecting the LEDs from fluctuations that would shorten their lifespan.
Without a properly matched driver, even the highest-quality LED strips will underperform or fail. A driver that’s too small will overheat and shut down. One with the wrong voltage will either starve your lights or burn them out. And a non-dimmable driver paired with a dimmer switch will flicker, buzz, or fail silently.
LED Driver vs. LED Transformer: is there a difference?
The terms are often used interchangeably in the industry. Technically, a transformer only changes voltage, while a driver also regulates output. In modern low-voltage LED lighting, most products marketed as ‘transformers’ are actually constant-voltage LED drivers. For the purposes of this guide, we’ll use ‘driver’ throughout.
Constant Voltage vs. Constant Current: Which Do You Need?
This is the most fundamental decision in LED driver selection, and it’s simpler than it sounds once you understand what each type does.
Constant voltage (CV) drivers
A constant voltage driver maintains a fixed, stable DC output voltage — typically 12V or 24V — regardless of h ow much current the load draws. The LED strip itself manages how much current it pulls.
Constant voltage drivers are what you need for LED strip lights. FULL STOP. If you’re buying LED tape, ribbon, or strip lighting, you want a constant voltage driver matched to your strip’s voltage.
Constant current (CC) drivers
A constant current driver maintains a fixed output current (measured in milliamps, or mA) while the voltage varies. These are used for LED modules, down-lights, and individual LED components that designed to operate at a specific current — typically 350mA, 700mA, or 1050mA.
Constant current drivers are not suitable for LED strip lights, which are designed for constant voltage input. Using a CC driver on an LED strip will produce incorrect output and can damage the strip.
Rule of Thumb
LED strip lights = constant voltage driver. LED modules, downlights, and discrete LEDs = constant current driver. If you’re installing LED strips from Inspired LED, you need a constant voltage driver at 12V or 24V.
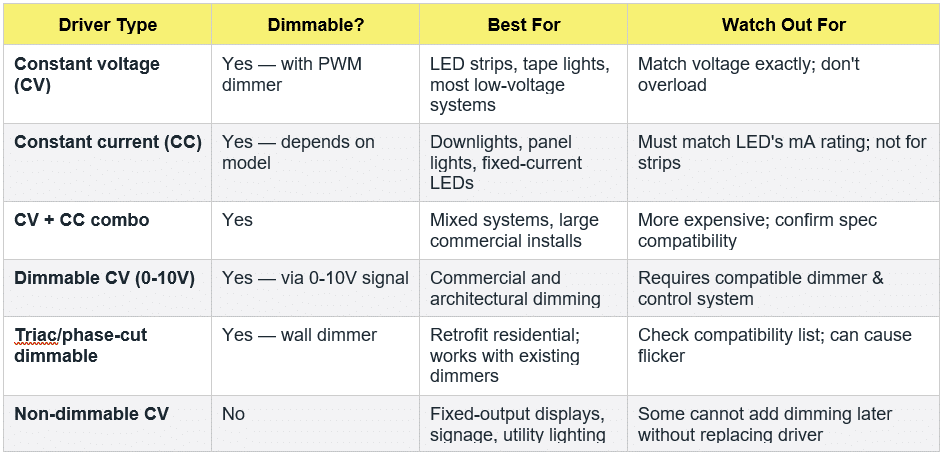
Driver type comparison at a glance
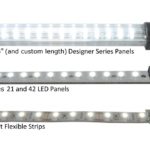
Step 1: Match the Driver Voltage to Your LED Strip
This is non-negotiable. Your driver output voltage must match your LED strip’s input voltage exactly. The two most common options are 12V DC and 24V DC.

Applying the wrong voltage has immediate and serious consequences:
- 12V driver on a 24V strip: very dim output or no output — strip is starved of voltage
- 24V driver on a 12V strip: immediate LED failure or rapid burnout — strip is overdriven.
Contractor Note
When installing LED strips in a multi-zone project, label every driver with its output voltage and the zone(s) it powers. A simple label prevents costly callbacks and warranty issues caused by cross-wiring during future modifications.
Step 2: Size Your Driver by Wattage — With a 20% Buffer
Undersizing is the most common LED driver mistake — and it’s the most damaging. A driver running at or near 100% of its rated capacity runs hot, trips its thermal protection, and has a dramatically shortened lifespan. the industry standard is to size your driver so the connected load does not exceed 80% of its rated wattage.
The wattage sizing formula
Total strip wattage = Watts per foot x Total run length in feet
Minimum driver wattage = Total strip wattage ÷ 0.80 (i.e., multiply 1.25)
Then round up to the neares standard driver wattage (common sizes: 20W, 40W, 60W, 96W, 100W, 150W, 200W, 320W).
Worked Example
You’re installing 20 feet of 24V high-density LED strip rated at 3.0W/ft. Total load = 20 x 3.0 = 60W. With 20% buffer: 60 ÷ 0.80 = 75W minimum. Choose a 96W or 100W driver. Do not use a 60W driver — it will be running 100% load and will overheat.
Driver sizing quick-reference worksheet

Running multiple strips from one driver
You can wire multiple LED strip runs from single driver as long as the combined wattage of all runs, with the 20% buffer applies, does not exceed the driver’s rating. Wire each run in parallel (both positive leads to the driver’s positive terminal, both negative leads to the driver’s negative terminal).
For longer multi-zone projects, consider a central junction box with individual runs radiating outward. Keep each individual run within its recommended length to avoid voltage drop at the ends.
Step 3: Choose the Right Dimming Method
Not all dimmable LED drivers work with all dimmer switches. Mismatched dimming is the leading cause of LED flickering, buzzing, and premature driver failure in residential and commercial installs. There are three main dimming methods for low-voltage Inspired LED systems:
1. PWM dimming (pulse-width-modulation)
PWM dimmers work by rapidly switching the DC power to the LED strip on and off. It works so fast (hundreds to thousands of times per second) that the human eye perceives smooth dimming rather than flashing. PWM is the most common dimming method for LED strip lights and is compatible with a wide range of controllers and smart home systems.
- Best for: LED strip lights, RGB/RGBW systems, DMX-controlled installations
- Requires: A PWM-compatible constant voltage driver and a PWM dimmer or controller
2. 0-10V dimming
0-10V dimming uses a low-voltage analog control signal (0 to 10 volts) to communicate with the driver and set output level. At 0V the driver typically dims to minimum (not off); at 10V it runs at full output. This is a standard protocol in commercial and architectural lighting and is common in office and retail environments.
- Best for: Commercial installations, office lighting, large-area architectural dimming
- Requires: A 0-10V compatible driver and a 0-10V wall station or control system
- Watch out for: Some 0-10V drivers don’t go to true zero. We recommend checking the minimum dim level in the spec sheet
3. TRIAC / Phase-Cut dimming
Triac dimmers (also called phase-cut or leading-edge dimmers) are the standard wall dimmer found in most homes. They work by cutting off a portion of the AC sine wave before it reaches the driver. Many dimmable LED drivers support triac input, making them a good choice for residential retrofit installs where the existing wall dimmer will be reused.
- Best for: Residential installs, retrofit projects with existing wall dimmers
- Requires: A triac-compatible LED driver and a compatible (usually listed) wall dimmer
- Watch out for: Compatibility varies by dimmer brand and model. Always check the driver manufacturer’s compatibility list prior to installation.
Dimming Compatibility Warning
Never connect a non-dimmable LED driver to a dimmer switch, even if the dimmer is designed for LED loads. The result is typically flickering, buzzing, overheating, or silent driver failure. Non-dimmable drivers must be used only with high-voltage on/off switching.
For Inspired LED applications, low-voltage in-line PWM dimmers can be used with non-dimmable constant voltage drivers. These include our 4-Push Button Dimmer, RF Wireless Remotes and Receivers, Independence Dimmer setup, and more!
Step 4: Select the Correct IP Rating for Your Environment
IP (Ingress Protection) ratings define how well an LED driver is sealed against dust and moisture. For indoor applications, IP rating is rarely a concern. For any installation near water — kitchens, bathrooms, outdoor spaces, pool areas — IP rating is critical.

As a general rule: if there’s any possibility of moisture exposure, step up one IP rating beyond what you think you need. A driver that fails due to moisture ingress is never covered under warranty and often damages the connected strip as well.
Thermal considerations for enclosed spaces
LED drivers generate heat during operation, and heat is the primary cause of driver failure. Ensure adequate airflow around the driver. Never mount a driver directly against insulation. For tight spaces, look for slim-profile drivers designed for low-clearance installation, or choose a driver rated for a higher ambient temperature (Ta rating on the spec sheet).
Additional Specs to Check Before You Buy
Efficiency rating
LED driver efficiency (expressed as a percentage) represents how much of the input power is converted to usable output while the rest is lost as heat. Better drivers achieve 85-92% efficiency. A more efficient driver runs cooler, lasts longer, and saves on energy costs over time.
UL Listing and certifications
For any permanent installation in the United States, use only UL-listed LED drivers. UL listing means the driver has been independently tested and certified to meet safety standards. In commercial projects, local building codes and insurance requirements often mandate UL-listed components. Look for the UL mark on the driver label or in the product specifications.