
3. Hallway Mirror w/ Motion Sensor

This project is two systems, the first is a 24v system using 24V 240ohm LED Strips, 18AWG in-wall rated cable, a motion sensor, and a 24v 3.75A plug-in power supply. The second system is a 12v RGB system highlighting the custom glass table top, using a 12v RGB flexible LED strip, 18AWG in-wall rated 4-conductor cable, RF RGB remote controller, and a 12v 2A plug-in power supply. We do not stock our RGB LED strips on our website, if you are interested in an RGB system call us at 480-941-4286 or email design@inspiredled.com with your project details.
Measuring the available space for the LED Strips:
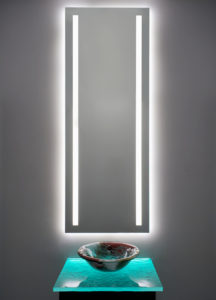
The 24V white LED system has a few different places where we installed the LED strips. First we measured out the perimeter of the mirror to run an LED on the outside of the mirror. This unit also had two large rectangles sandblasted on the left and right side running length wise of the mirror. This allowed us to run two vertical LED strips in each rectangle. Like the last project we installed the LED tape into an aluminum extrusion and installed that on the back of the mirror the length of the sand blasted portion of the mirror.
The 12V RGB LED system is one strip measured the width of the table. Once cut we install the LED strip into an aluminum extrusion like the ones behind the mirror. The only difference is we recess this aluminum extrusion into the wall so we can push the glass table top right up to the panel. This shoots the light directly into the glass table top, with the RGB lights this allows you to change the color of the table!
Providing Power to the System:
Both of these systems use a standard plug-in power supply with a couple differences. The LED strips we used behind the mirror need a 24v power supply to light up. The RGB lights only need a 12V power supply to light the system up, this is why we need two different power supplies.
The 24V system is being controlled by a motion sensor, once a body is in range the LED lights will come on, once the sensor detects no motion after a certain amount of time the lights will turn off. The 12V RGB system needs a controller to change the color of the LED strips. It comes with a wireless remote that has a color wheel on it allowing you to pick certain colors quickly and easily.
Wiring the System:
The 24V white LED system had an 18AWG 2-conductor cable ran through the wall before the mirror was installed. This allowed us to quickly terminate the LED strips with the cable that was in place before finally installing the mirror. We used our standard interconnect cable to splice to the in-wall cable using standard wire nuts. Then we simply plugged in our interconnect cable to the connectors soldered to the end of the LED strips.
The 12V RGB system needs a 4-conductor cable instead of a 2-conductor cable. This is because the RGB system has 4 conduction points, power (+), red (R), green (G), and blue (B). All of our RGB LED strips come with a pre-soldered 4-conductor cable lead at your requested length to tie back to the controller. To terminate the LED strip to the controller you simply match the color of the cable with the corresponding color on the controller. Black cable -> Power, Red cable -> R, Green cable -> G, and Blue cable -> B. Test the LED strip by trying to find each color on the color wheel, if any colors do not match the color chosen on the color wheel then check the connections and make sure each color cable is in the correct output terminal. If you have any questions regarding this project or questions regarding RGB systems, give us a call at 480-941-4286 or email design@inspiredled.com.
Videos
 How to Cut, Connect, and Power LED Flexible Tape
 Plug-In Power Supplies