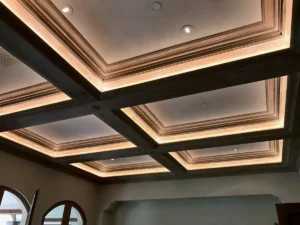
Soffit Project- Hardwired 24V

This soffit job is configured in a hardwired system using a dimmer switch, transformers, micro-lock Tiger Paw LED Connectors®, bulk in-wall cable and bulk 24V 240ohm flex strips.
Measure available space for flex:
The first think that needs to be done for this job is to measure the lengths of the area of where the lights will be mounted. Measuring out the area helps to determine the amount of flex you will need as well as the amount of power required in order to light everything. Once you have the full measurement of an area you will need to subtract 3” to make room for the Tiger Paw LED Connectors® on each side of the flex. In this job, all the soffits were the exact same size which made getting the measurements a little easier since it only had to be done once. This job was also done using bulk flex rather than custom length strips. When using bulk flex it is a good idea to buy a little more flex than needed instead of the exact length. The reason to get extra flex is because you are never sure on which cut lengths will be the best one to use for the job. It may be a case where you can actually fit an extra inch on each flex strip rather than what you originally thought possible.
Mounting the flex strips:
Before mounting the flex strips you will want to clean the area, where you plan on placing them, with isopropyl alcohol to remove any dust or dirt. In this job the flex was mounted on the soffit facing up towards the ceiling. As mentioned before, this install used bulk flex and micro-lock Tiger Paw LED Connectors® for this install. When installing bulk flex, you will want to place a Tiger Paw LED Connector® on one end of the reel and measure out the entire flex length to make sure it isn’t too long or short. With really long runs, it can help to use painters tape to temporarily hold own the flex in place to see what the correct distance is. Once you have reached the desired length, you will need to cut the strip on the closest cut point. Keep in mind that you will need to add on another Tiger Paw LED Connector® on this side of the flex too, so you don’t want the flex to be too long. The second reason you don’t want to have the flex too long is because it makes it harder for installing the cables into the connectors.
Providing Power:
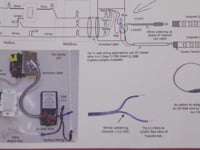
When using Tiger Paw LED Connectors® it is a good idea to provide power to the lights so that the connections can be tested before the LED strips are installed. Running the power cables can also help to continue testing the lights when adding more tiger-paws and cables to connect the rest of the LEDs in the series. When providing power to the lights, the first thing that should be done is figuring out where the transformer will be mounted because this shows how the cable will need to be ran. The transformer can be mounted just about anywhere as long as it is not inside the wall because it will need to breathe a little bit and you will want to have access to it in the future. For this job the customer installed both transformers in the attic above the lights which keeps it hidden but still allows access to it. Having the transformer in the attic also allows for an easier job of running the cables while still keeping them hidden.
Wiring Cables:
In this job the customer used micro-lock Tiger Paw LED Conectors for their connections which are recommended to be used with solid gauge cable. Each transformer had three cable runs coming out of it which ran to each individual crown lighting area. Once the cable reached each designated crown area, it dropped out of the ceiling and was connected to the first strip in the series. When making the connections to the first light strip, be sure that the polarities of the cable are matched up with the polarities of the flex connector. The polarities will need to be continuously checked when connecting the rest of the flex strips in the series as well. For this job the customer used a small piece of cable to jump around the corners and connect the flex strips together. The cable was able to be hidden behind the small trim just like the flex was.
Installing the Dimmer Switch:
When installing a hardwired system you will need to use a wall dimmer switch to control the lights. The dimmers can be installed just about anywhere in the wall but keep in mind that it will need to tie in with the transformer. This means that a cable carrying 120V will need to be ran from the dimmer switch to where the transformer is mounted.
Instruction Sheets
Check out our video tutorials below!
Videos
 How to Cut, Connect, and Power LED Flexible Tape
 Hardwire Transformer Installation
 Tiger Paw Connectors by Inspired LED