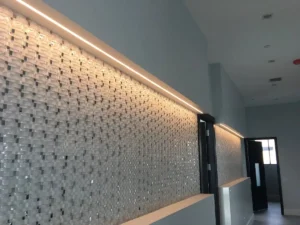
Narrow In-Wall Series

Measure available space for flex:
The first thing that needs to be done for this job is measure out the area of where the lights will be installed. For In-wall installs the first measurements that needs to be made are how long of an area you need for the wall reveal. The area measured out will help determine how much of the wall reveal and lens will need to be purchased. The wall reveal is a product from Pittcon and is only sold in 12’ and 6’ pieces so knowing the measurements of the area will determine which sizes and how many pieces will need to be purchased. The narrow diffusor “Pi” lens is provided by Inspired LED and only comes in 6’ lengths which means the measurements will need to be accurate for this product as well.
Cutting the surface for the wall reveal:
Once the measurement lengths are figured out for the in-wall fixture, you will need to make your cuts in the sheet rock for the install. It’s best to use a level or T-square as a guide to measure and mark the length and width of the wall reveal in the desired location. The width of the final cut out should measure ¾” for the narrow in-wall system. Use an oscillating saw or jab saw to cut away the marked area of the dry wall. Be sure to clean out as much debris as possible from inside the wall. After the cut out has been made you will want to set up the power source and run the cables to each of the areas where the in-wall lights will be installed.
Installing the Dimmer Switch:
When installing a hardwired system you will need to use a wall dimmer switch to control the lights. The dimmers can be installed just about anywhere in the wall but keep in mind that it will need to tie in with the transformer. This means that a cable carrying 120V will need to be ran from the dimmer switch to where the transformer is mounted.
Providing Power:
Before wiring cables, it is best to figure out where the power source will be installed so that you know the best way to run the cables. The transformer can be mounted just about anywhere, as long as it is not inside the wall because it will need to breathe a little and you will want to have access to it in the future. The transformer for this job was installed in the crawl space above the ceiling which helps keep it hidden but still allows access to it if needed. Having the transformer in the crawl space also allows for an easier job of running the cables to the lights while easily keeping them hidden.
Wiring Cables:
This job had three different cable runs come out of the transformer that ran to three separate parts of the lights. One of the cables was ran to the smaller in-wall light and the other two cables were ran to opposite sides of the long in-wall light. The reason that the long in-wall light had two cables run to it is because it had to be powered from both sides to avoid voltage drop. After about 10’ the Mega Bright Flex will begin to have a slight voltage drop that becomes more and more noticeable the longer it is. Having the flex powered from both ends will eliminate this voltage drop and allows the possibility of longer runs of flex. When the cables have been ran from the transformer to the cut out areas in the sheet rock, you will then continue to install the rest of the in-wall narrow reveal.
Installing the wall reveal:
Insert the wall reveal into the cut out hole while making sure the cable drop is still accessible. You’ll secure the reveal to the drywall using sheetrock screws every 12”-18”. Once secured in place you will want to install the mud cap on the end where the cable will be mounted. Next you will need to apply joint tape and drywall mud over the edges and mud caps. After the drywall mud and paint has dried, you will want to add in the flex strip. Measure out the flex to the same length as the in-wall reveal channel. It is ok if the flex is a little longer and goes into the wall a little bit. Connect the flex strip to the cable by either soldering or by using tiger paw solderless connectors. In this job the customer hand soldered the cable to the flex. Before installing the flex inside the channel, make sure that it is clean from mud or debris. When mounting the flex, try to align it as straight and centered as possible for even light distribution. Finally the lens will need to be cut to size (if it’s too long) using a chop saw. After the lens is the perfect length, it can be placed inside the in-wall channel. For more detailed instructions see Inspired LEDs Spec sheet on Impression Series In-Wall Narrow system Installation guide.
Instruction Sheets
Check out our tutorial videos below!
Videos
 How to Cut, Connect, and Power LED Flexible Tape
 Magnitude Electronic Transformer Inspired LED
 Tiger Paw Connectors by Inspired LED