8. Independence Dimmer Dual Switch System
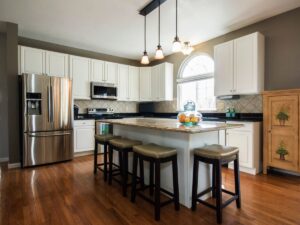

This kitchen is a plug and play system that is using power supplies, a Dual Independence Dimmer with two receivers, interconnect cables and custom flexible LED strips.
Measure available space for flex:
Start by measuring out the entire length of the area where the flex strips will be mounted. Once you have the full measurements of an area, you will need to subtract 3” in order to make room for the cable connectors on each side. Before measuring the cabinets, it is a good idea to know where you plan on mounting the flex strips.
Mounting Options for the flex strips:
Under cabinet flex- There are two common mounting options when it comes to under cabinet flex strips. The first option is mounting the flex on the front trim of the cabinet with the LEDs facing towards the backsplash. Mounting the flex this way will highlight the backsplash and help to eliminate a reflection off the counter top. The second option is to mount the flex strip 2” from the front of the cabinet facing straight down. Having the flex mounted in this format will give the most task light under your cabinets. Mounting the flex straight down is what the customer decided to do for this install.
Above cabinet flex- Just like mounting flex strips on the underside of the cabinets, there are two mounting options when it comes to placing flex above the cabinets. One option that can be used, if there is accent trim on the cabinets, is to run the flex on the trim so that it angles the lights towards the corner where the wall and ceiling meet together. The other place to mount the flex strips is about two inches from the back wall, so that the light runs up the side of the wall giving it a nice glow. For this kitchen job the customer decided to go with the second option and mounted it 2” from the back wall.
Once you have decided on where you want to mount your flex strips, you will want to clean the areas of where the flex will be. Use isopropyl alcohol to remove any dust or dirt that may be on the cabinet where the flex will mount to.
Dividers under cabinets:
In most cases there will be dividers under and on top of the cabinets that separate them from each other. When there are dividers under the cabinets you can make a slight modification to them to make installing the LED flex easier and more affordable. The two modification options are to either make a slot in these dividers for the flex to fit in or to drill a ½” hole in them for the flex strip to slide through.
Providing Power:
After knowing where and how the lights will be mounted, it is a good idea to figure out where the power supply will be mounted so that you’ll know how to run the cables. For this install there are two power supplies used. One of them is plugged into the outlet that was installed in the cabinet above the microwave and the second one is plugged into an outlet that was installed above the cabinet to the right of the sink.
Installing the Independence Dimmer:
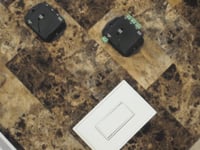
Both of the outlets that the power supplies are plugged into are not switched outlets, so the customer needed a different method for controlling the lights. The customer ended up using a Dual Independence dimmer switch and two receivers for this job. The Dual Independence dimmer switch gives the ability of having only one switch but being able to control the upper lights and the under cabinet lights together or separately. The Dual Independence dimmer also uses RF signals to control the receivers, so the receivers can be mounted anywhere without having to worry about being in the line of sight of the dimmer switch. Since the receivers don’t have to be in line of sight, the customer can install one in the cabinet above the microwave and have the other sitting on the top of the cabinet where the second power supply is located. To power the Independence receivers, you will plug in the power supply into the “power in” input on the receiver. Then the interconnect cables will plug into the “zone 1” and “zone 2” outputs. To control the lights together they will need to be plugged into the same zone output. For example, to have the under cabinet lights controlled together, they should both be plugged into the “zone 1” outputs.
Wiring Cables:
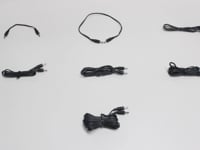
This kitchen set up has a total of four runs of LED flex strips, two for the tops and two for the under cabinet lights. The two runs that are on the cabinet to the right of the sink are the easier ones to set up as they only have one strip each. There isn’t much that needs to be done for the above cabinet light since the receiver is on top of the cabinet and the cable will come out of that and plug right into the flex strip. The cable can just sit on top of the cabinet because it will be out of sight. For the under cabinet light though, the cable will need to be run to the bottom. In order to do this a 3/8” hole will need to be drilled in the top right hand corner toward the front of the cabinet. That way the cable can run inside the cabinet and hide behind the stile (front inside trim of the cabinet). Once the cable gets to the bottom another 3/8” hole will need to be drilled in the bottom front corner so that the cable can pop out the bottom and plug into the flex strip.
On the microwave side of the kitchen the cables will both start inside of the cabinet above the microwave where the dimmer receiver is. Running the cable up to the lights above the cabinet can be done in two similar formats. A 3/8” hole will need to be drilled into the top of the cabinet to get access to above. The hole can either be drilled in the back left corner or in the front left hand corner, whichever is an easier option. To get the cables down to the under cabinet lights there will need to be two holes drilled for each cable. The first hole will need to be drilled in the bottom left corner of the cabinet above the microwave, going straight into the cabinet to the left of the microwave. This hole will allow the cable to go into the cabinet next to the microwave and be able to run down the front corner while being hidden behind the stile. The second hole will be drilled in the bottom right hand corner of this cabinet so that the cable can come out the bottom and plug into the flex strip. To get a cable down to the right side of the microwave the same format can be used except the first hole will be drilled in the bottom right hand corner of the cabinet above the microwave and the second hole would be in the bottom left corner of the cabinet next to the microwave.
Instruction Sheets
Check out our video tutorials below!
Videos
 Independence Dimmer - In Action %7C Inspired LED
 Interconnect Cables | Inspired LED
 How to Cut, Connect, and Power LED Flexible Tape
 Plug-In Power Supplies