6. RF Remote Dimmer System


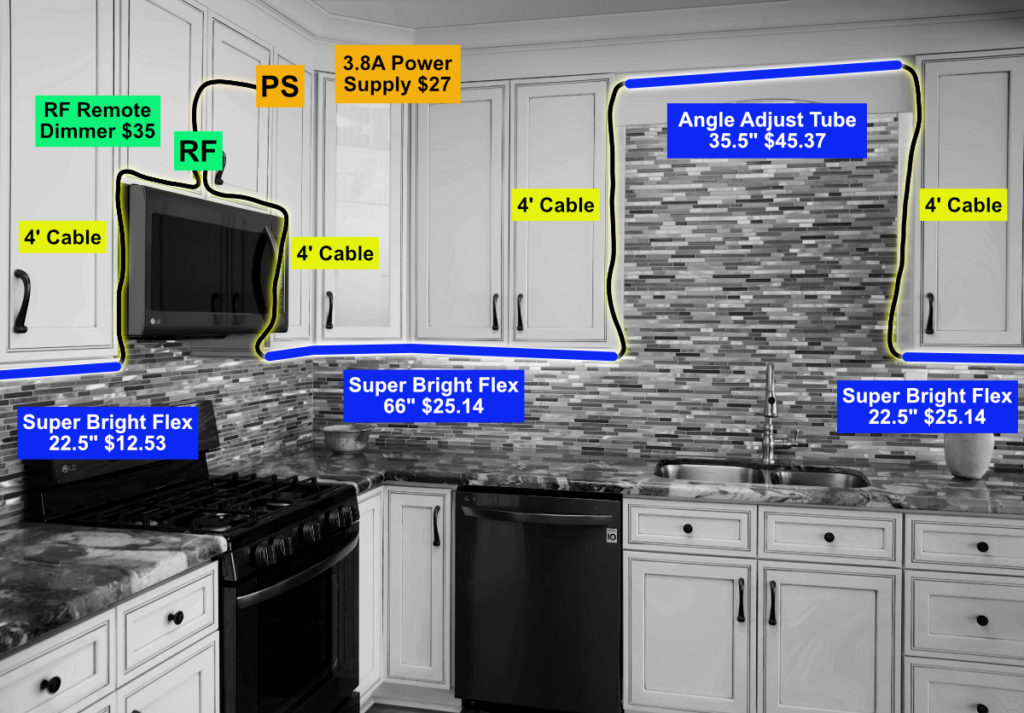
This kitchen is a plug and play system that is using a plug in power supply, single zone RF remote dimmer, interconnect cables, custom flex strips and one angle adjust tube.
Measure available space for flex:
Start by measuring out the entire length of the area where the flex strips and lights will be mounted. Once you have the full measurement of an area, you will need to subtract 3” in order to make room for the cable connectors on each side. Before measuring the cabinets, it is a good idea to know where you plan on mounting the flex strips.
Mounting Options:
There are two common mounting options when it comes to under cabinet flex strips. The first option is mounting the flex strip on the front trim of the cabinet with the LEDs facing towards the backsplash. Mounting the flex this way will highlight the backsplash and help to eliminate a reflection off of the counter tops. The second option is to mount the flex strip 2” from the front of the cabinet facing straight down. Having the flex mounted this way will give the most task light under your cabinets. For this job the customer decided to go with the first option of mounting the flex on the trim of the cabinet with the LEDs facing towards the backsplash. Mounting the flex this way also allows using only one flex strip when going around corner cabinets such as the one in this job.
In this job the customer also installed an Angle Adjust tube light above their sink. The most common mounting option for an angle adjust tube above the sink is placing it on the back of the valence facing towards the wall. Having it mounted in this format allows the light to be a little closer to the sink while still having the ability to angle the light in any direction.
Dividers under cabinets:
In most cases there will be dividers under cabinets that separate them from each other. When there are dividers under the cabinets you can make a slight modification to them to make installing the LED flex easier and more affordable. The two modification options are to either make a slot in these dividers for the flex to fit in or drill a ½” hole in them for the flex strip to slide through.
Providing Power:
After knowing where and how the lights will be mounted it is a good idea to figure out where the power supply will be mounted so that you can figure out how to run the cables. For this install the power supply is plugged into an extra outlet in the cabinet above the microwave.
Installing the RF Dimmer Remote:
Since the outlet above the microwave is not a switched outlet, the customer needed a different method for controlling the lights. They decided to go with a RF wireless dimmer which allowed them to control the lights with a remote. Since this dimmer uses RF signals, the remote does not need to have line of sight to the receiver to control it. Having this option allows the customer to place the receiver inside of the cabinet above the microwave next to the power supply. The other nice thing about the RF remote dimmer is that it can be made to have two outputs which makes things easier for wiring cables when you have two runs of lights going in opposite directions.
Wiring Cables:
As mentioned earlier, this kitchen set up has two runs of LEDs going in opposite directions from the microwave. Since they are using a RF dimmer they have the ability to have two outputs and easily run a cable to either side. To get the cables down to the bottom of the cabinets, the customer drilled a 3/8” hole directly into the side of the cabinets next to it. The hole was drilled in the front bottom left and right of the cabinets so that they would be hidden behind the stile of the cabinet. Once the cable was inside the cabinet next to the microwave, it was ran to the front bottom corner being hidden be the stile the entire time. Then another hole was drilled in the bottom front corner so that the cable could be plugged into the flex strips mounted under the cabinet.
When running cables up to the angle adjust tube, above the sink, the cable was ran up inside the cabinet behind the stile once again. Then when it reached the top of the cabinet a hole was drilled out the side so that it could plug into the angle adjust tube. The same method was used to go back into the cabinet and reach the final under cabinet flex strip on the right side of the sink.
Instruction Sheets
Check out our tutorial videos below!
