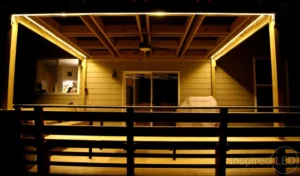
Pergola

This outdoor job is a hardwired system that uses Inspired LED’s custom sleeved outdoor flex strips, bulk 18awg cable, a wall dimmer switch and a low voltage landscape transformer.
Measure available space for flex:
The first thing that needs to be done for this job is to measure the length of the area of where the lights will be mounted. Measuring out the area helps to determine the amount of flex you will need as well as the amount of power required in order to light everything up. Once you have the full measurement of an area, you will need to subtract 3” in order to make room for the cable connectors on each side. This job had six different runs of lights that needed measurements done.
Mounting the flex strips:
Before mounting the flex strips you will want to clean the area, where you plan on placing them, with isopropyl alcohol to remove any dust or dirt. For this job, the customer wanted to discreetly add some accent light to their gable roof. The customer installed the lights on the trim of the cable facing towards the house for a nice accent light that is hidden up out of the way. The flex strips were first temporarily mounted to the trim of the roof with painters tape. This allows the ability to see the placement of the lights as well as testing the lights to see how they look. Once the customer was satisfied with the placement of the lights, the permanent install was performed using silicone adhesive. Inspired LED recommends using the clear silicone adhesive made by GE that is weatherproof and 30min rain ready which can be purchased at most local hardware stores. Be sure that the silicone adhesive is completely dry before removing the painters tape from the flex strip.
Providing Power:
To test the lights when they are temporarily mounted with the painters tape, you will need to figure out where the power source will be mounted. In this job the customer used one of their old low voltage landscape lighting transformers to power the system. When using landscaping transformers you will want to pay attention to the output voltage to see if it is AC or DC. In most cases the landscaping transformers will put out an AC voltage, which means the voltage will need to be changed to DC in order to be compatible with Inspired LEDs products. To convert the AC power to DC, Inspired LED will install an AC/DC diode bridge onto the beginning of each flex strip that will also contain a 3’ flying lead. The 3’ flying lead will be how the strip is connected to the cables ran.
Wiring Cables:
As mentioned above, the outdoor flex strips are typically provided with a 3’ flying lead to connect to power cords. The customer of this job used a class 2 shielded low voltage 18awg cable to connect to the flying lead of the LEDs and run back to the transformer. The cable for all the lights were ran discretely through the attic in order to keep it all hidden. Wire nuts were used to connect the bare leads of the cables together. If the wire nuts are going to be used in an area that can get wet then it is recommended to use weatherproof wire nuts.
Installing the Dimmer Switch:
When installing a hardwired system you will need to use a wall dimmer switch to control the lights. If you are providing your own landscaping transformer be sure that you are using a dimmer that is compatible with it. Typically transformers will either be a magnetic transformer or an electronic transformer and this will tell you which type of dimmer you will need to pair it with. The dimmers can be installed just about anywhere in the wall but keep in mind that it will need to tie in with the transformer. This means that a cable carrying 120V will need to be ran from the dimmer switch to where the transformer is mounted.