1. Bathroom Mirror- Plug-In System


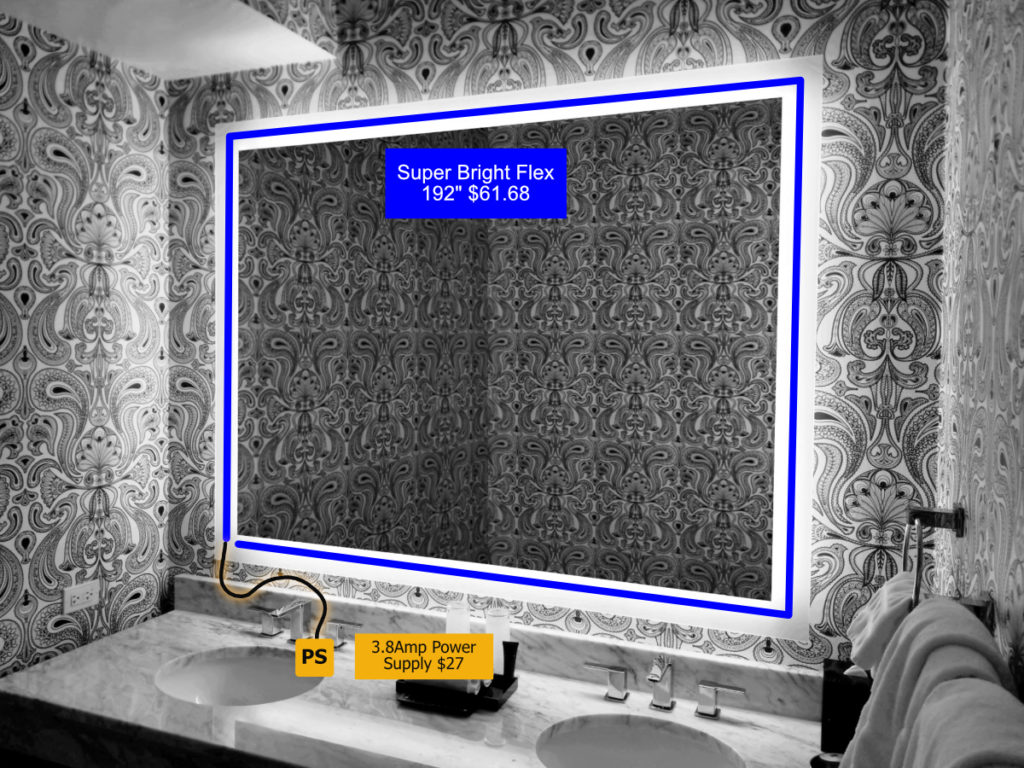
This bathroom mirror light is configured in a plug and play system that is using a plug in power supply and a custom Super Bright flex strip.
Measuring the available space for the flex:
Start the project by measuring out the entire length of the area where the flex strip will be mounted. Once you have the full measurement of an area, you will need to subtract 3” in order to make room for the cable connectors on each side. In this job though, since there is only one connector being used, it would be ok to only subtract 1.5” from the total length.
Mounting options for flex strips:
For backlighting a mirror or fixture the flex can be mounted two different ways. The first option would be to have the flex strips mounted on the fixture facing out and away from the mirror/fixture. Mounting the flex this way allows the ability of only needing to use one long flex strip but it requires an area on the fixture for the flex to mount to. The second mounting option would be to have the flex strip mounted directly on the back of the mirror, facing back against the wall. This option would require four individual strips and cables to join them together because the flex does not turn around corners as well. However, this option tends to be more common because not all fixtures have a mounting option for the flex to run all the way around it. For this job, the first mounting option was used because the mirror had a backing on it that went all the way around in an even square and even pushed it away from the wall when it was hung up. Before mounting the flex you will want to clean the area, where you plan on placing the flex, with isopropyl alcohol to remove any dust or dirt.
Providing Power:
After knowing where and how the lights will be mounted, it is a good idea to figure out where the power supply will be mounted so that you can figure out how to run the cables. In this job the power supply plugs into a switched outlet under the sink and then plugs straight into the flex strips. Since it is plugging straight into the lights there are no need for other cables but the distance from the outlet to the lights should be double checked. The power supplies come standard with a 6’ cable but can be extended to a longer custom length for $5 if needed.
Wiring the cable:
In this job, the customer only had to worry about hiding the power supply cable. Luckily most of the cable was easily hidden inside the cabinet under the sinks. Then to get from under the sink to behind the mirror the cable was ran behind the wall until it popped out behind the bottom left corner of the mirror.
Instruction Sheets
Check out our tutorial videos below!

