4. Push Button Dimmer System


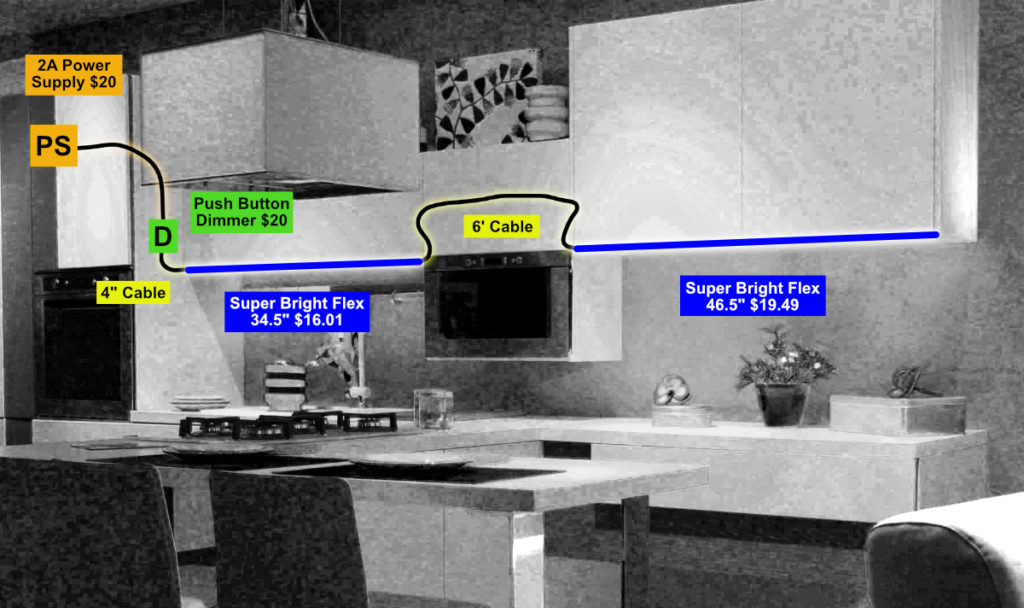
This kitchen lighting is a plug and play system using a plug in power supply, push button dimmer, two cables and two custom flex strips.
Measure available space for flex:
To build this set up you will need to first measure out the entire length of the area where the flex strip will be mounted. Once you have the full measurement you will need to subtract 3” in order to make room for the cable connectors on each side. For this project, the customer had decided to mount the flex strip 2” from the front edge of the cabinet facing down on the countertop which will give it the most task light. The other mounting option would be to have it mounted on the front trim with the LEDs facing towards the backsplash. The second option may not give as much task light but it helps to highlight the backsplash and helps eliminate the reflection off of the countertop.
Dividers under cabinets:
This cabinet set had a full run underneath with no interference so we are able to run one long flex strip which makes installation easier and less expensive. However, not all cabinets will have a straight run, most will have dividers underneath them. When there are dividers under the cabinets you have two options to modify the cabinets so it is able to have long runs of LED strips. The two options are to either make a slot in these dividers for the flex to fit in or drill a 1/2” hole in them for the flex strip to slide through.
Mounting the flex strip:
Next you will want to clean the bottoms of the cabinets, where you plan on mounting the flex, with isopropyl alcohol to remove any dust or dirt. As mentioned earlier, this cabinet design had the flex mounted 2” from the front of the cabinet facing down on the countertop. The other mounting option would be to have it mounted on the front trim facing towards the backsplash. The second option may not give as much task light but it helps to highlight the backsplash and helps eliminate the reflection off of the countertop. A good way to decide on which mounting option you prefer is to use painters tape to hold the flex strip in place so you can see how the lights will look.
Wiring Cables:
To hide cables from being seen, you will want to drill a hole in the bottom front corner of the cabinet so that the cable can be hidden inside, behind the stile (vertical pieces of the front frame). When using Inspired LED’s Interconnect Cables you will need a drill bit that is 3/8” in diameter for the connector to fit threw. Once the hole is drilled, run the cable up through the inside of the cabinet behind the stile. Use Inspired LED’s Cable clamps to hold the cable in place as well as any excess cable.
For this job, the customer had to run a cable up over the microwave to get to the second LED flex strip. In this set up, the microwave is actually mounted below the bottoms of the cabinets allowing two options for running the cable over it. Both options will start by drilling a hole in the bottom front of the cabinet to hide the cable on the inside behind the stile. The next step will be based off of which way you want to run the cable.
Option 1: Run the cable along the top of the cabinet above the microwave. This a very easy way to keep the cable hidden as it will just sit on top of the cabinet. You would simply run the cable up along the stile, then drill a hole out the top corner of the cabinet so the cable can be placed above the cabinet. Then run the cable across the top of the microwave cabinet until you have reached the side of the tall cabinet next to it. After getting to the tall cabinet, drill a hole into the side of the cabinet low enough so that it can’t be seen behind the top trim. Place the cable into the tall cabinet running it once again along the inside stile of the cabinet until you reach the bottom. Once you reach the bottom you will again drill a hole in the front corner for the cable to go through.
Option 2: Run the cable on the inside of the cabinet above the microwave. This is a good option for cabinets that don’t have a trim along the tops of their cabinets to hide the cable. It is also a great option for cabinets that have their tops run all the way to the ceiling. For this option, you would drill a hole into the side of the cabinet that is above the microwave. Once the cable is inside the cabinet you will run it to the back of the cabinet running along the bottom side so that it is out of the way. When it reaches the back, continue running the cable along the back so that it reaches the other side of the cabinet. From here it will come right back to the front of the cabinet so that it is in the bottom right corner behind the stile again. Two holes will need to be drilled in the cabinet to the right of the microwave, the first will be into the side of the cabinet and the second will be in the bottom left corner. Once these holes are made, the cable will now be able to connect to the second strip that is on the right side of the microwave.
Provide Power:
Plug in the power supply into an outlet or switched outlet if you want to control it from an on/off wall switch. In this case the power supply is plugged into an extra outlet in the cabinet above the oven. Normally with a regular outlet the lights would stay on at all times. However, this customer wanted to be able to turn their lights on and off as well as have the ability to dim the lights if they wanted to. For that reason they have decided to install a 4 position push button dimmer.
Mounting the Push Button Dimmer
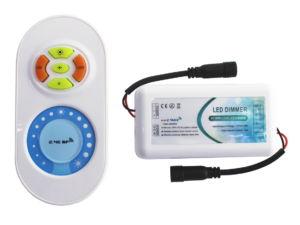
When mounting the 4 Position Push Button Dimmer, you will want to place it in the very beginning of your flex strip run in order to control all the lights. In this case, since the power supply is plugged into an outlet inside the cabinet above the oven, the switch will be mounted on the left side of the run. The dimmer will need to be mounted on the underside of the cabinet so that it is hidden from view behind the trim of the cabinet but also easily accessible. Before mounting the dimmer, take note of the markings above the inputs. One input will be labeled as “power in” and the other will be labeled as “LEDs”. For clean and easy cable connections, you will want to have the “power in” label facing towards the side of the cabinet closest to the oven where the power cable will be coming from. Mounting the dimmer this way also makes it easier to connect to the LEDs as well since the push button dimmer comes standard with a 4” cable.
Instruction Sheets
Check out our video tutorials below!
