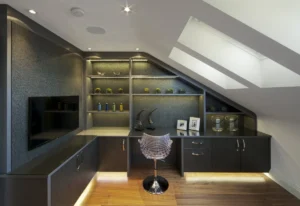
Home Office – Hardwired System

Measure available space for flex:
The first thing that needs to be done for this job is to measure the length of the areas where the lights will be mounted. Measuring out the area helps to determine the amount of flex you will need as well as the amount of power required in order to light everything up. Once you have the full measurement of an area, you will need to subtract 3” in order to make room for the cable connectors on each side.
Mounting the flex strips:
Before mounting the flex strips you will want to clean the area, where you plan on placing them, with isopropyl alcohol to remove any dust or dirt. In this job the flex was mounted under each shelf about 2” from the front and there was also flex mounted to the toe kicks on the bottom of the cabinets. For the three top shelf lights the customer drilled a hole in the divider between the two shelves in order to have one long flex strip go across. Running one long flex strip makes installing easier and less expensive. This also allows the use of more light since you will not need a cable to connect the flex together. In order to make room for the flex strip to fit through the divider a ½” hole will need to be drilled.
Installing the Dimmer Switch:
When installing a hardwired system you will need to use a wall dimmer switch to control the lights. The dimmers can be installed just about anywhere in the wall but keep in mind that it will need to tie in with the transformer. This means that cable carrying 120V will need to be ran from the dimmer switch to where the transformer is mounted. In this job the dimmer was installed on the wall walking into the room and the cable was ran in the wall to the bottom cabinet of the desk where the transformer was installed.
Providing Power:
Before wiring the cables, it is best to figure out where the transformer will be installed so that you know the best way to run the cables. The transformer can be mounted just about anywhere, as long as it is not inside the wall because it will need to breathe a little and you will want to have access to it in the future. As mentioned earlier the transformer for this job was installed in the bottom corner cabinet of the desk. Having the transformer in the bottom cabinet keeps the transformer hidden while still allowing an easier route of running the cables to the lights.
Wiring Cables:
This job had several different runs of lights that came out of the transformer which required the use of bigger wire nuts. Two of the cables were ran to the other side of the desk by going through the inside of the cabinet and then running across the underside of the desk to be hidden. Then once the cables reached the other cabinet there was a hole drilled on the side of so the cables could be ran to the lights while still being hidden. The four cables that powered the flex strips on the left side of the desk had to be ran ahead of time in order to be hidden behind the left wall of the shelves. If it is not possible to get behind certain walls or fixtures then an alternative would be to run the cables up the corner and then use a channel to hide the cables.
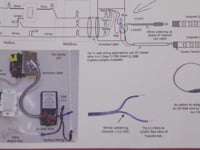
Instruction Sheets
Check out our video tutorials below!
Videos
 How to Cut, Connect, and Power LED Flexible Tape
 Hardwire Transformer Installation
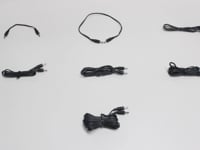 Interconnect Cables | Inspired LED